
You’ve spent ten hours posing your characters. You’ve tweaked the lights until your eyes hurt. Then, you hit “Render.” But when you look at the final file, it looks… okay. It’s a bit flat. The colors don’t pop, the atmosphere feels thin, and it clearly looks like it came straight out of a game engine from 2012. You see those incredible posters on social media and wonder why your work doesn’t have that “glow.”
The secret isn’t a better computer or a hidden setting in Source Filmmaker. The secret is the SFM comp. Most beginners think the render is the final step, but for professionals, the render is just the raw material. If you aren’t compositing your work, you’re leaving 50% of your art’s potential on the table. This guide will show you how to bridge that gap.
What is an SFM Comp?
In plain English, an SFM comp (short for compositing) is the process of taking your raw render out of Source Filmmaker and layering it with effects, color corrections, and lighting enhancements in a secondary software. Think of it like digital makeup for your 3D scene.
Source Filmmaker is an aging engine. While it’s powerful for posing and animation, its internal lighting and color processing have limits. Compositing allows you to bypass these limits. By using software like Adobe After Effects, DaVinci Resolve, or even Photoshop, you can add depth, fix clipping issues, and create a mood that the base engine simply can’t produce on its own.
The SFM Comp Explained: A Real-World Scenario
Imagine you are creating a scene where a character is standing in a rainy, neon-lit alleyway.
In Source Filmmaker, you might struggle to get the “wet” look on the ground or the way neon light bleeds into the foggy air. Your raw render might look a bit “dry.”
When you move to the SFM comp stage, you don’t just accept that dry look. You render your character and the alleyway as separate layers or passes. In your compositing software, you add a “Glow” effect to the neon signs. You add a “Screen” layer of falling rain textures over the top. You apply a “Curves” adjustment to deepen the shadows in the corners while keeping the character’s face bright.
Suddenly, that dry, flat scene feels like a frame from a big-budget cyberpunk movie. The comp is where the soul of the image is born.
What is Joi? The Ultimate Guide to JavaScript Data Validation
Step-by-Step: Your First Professional SFM Comp
If you want to move beyond “beginner” status, stop rendering to MP4 or AVI immediately. Follow these steps to set up a professional workflow.
-
Export as an Image Sequence: Instead of a video file, export your project as a PNG or TGA sequence. This preserves the highest possible image quality and ensures that if your computer crashes during the render, you don’t lose the whole file.
-
Render Multiple Passes: If your scene is complex, render the background and the foreground characters separately. This gives you total control over the focus and lighting of each element during the SFM comp phase.
-
Import to Your Compositor: Open your sequence in a tool like After Effects or HitFilm. Ensure your frame rate matches your SFM export (usually 24 or 60 FPS).
-
The Layer Sandwich: Place your background at the bottom. Place your characters in the middle. Place “Atmospheric” layers (like dust motes, fog, or lens flares) on the very top.
-
Apply Color Correction: Use a tool like Lumetri Color to balance the whites and blacks. A slight blue tint in the shadows and an orange tint in the highlights (the “Blockbuster Look”) works wonders.
-
Add Camera Effects: SFM’s motion blur and depth of field are good, but adding a subtle “Lens Grain” or a “Chromatic Aberration” effect in post makes the render look like it was filmed on a real camera.
Common Mistakes People Make
Even experienced users fall into traps when they start compositing. Here is what to avoid:
-
Over-Editing: The most common mistake is “Over-Saturating.” If your colors are so bright they “bleed,” you’ve gone too far. Subtlety is the hallmark of a professional SFM comp.
-
Ignoring the Black Levels: If your “blacks” are grey, your image will look washed out. Always check your levels to ensure your shadows have actual depth.
-
Forgetting the Rim Light: Many artists try to “fix” lighting in the comp that should have been handled in SFM. You still need a good rim light on your model in the engine to separate them from the background.
-
Mismatching Frame Rates: If you render at 24 FPS but your compositing project is set to 30 FPS, you will get “ghosting” or stuttering. Always keep these numbers identical.
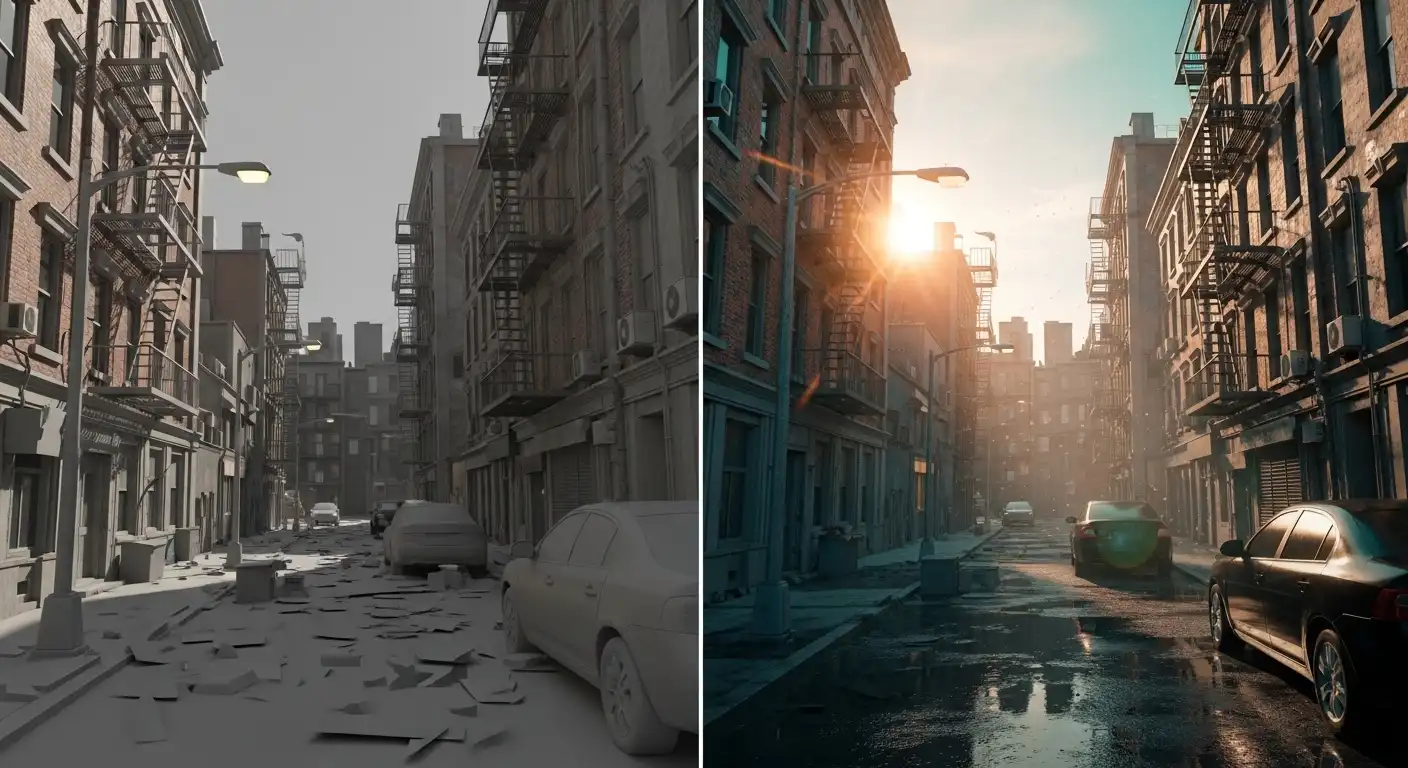
SFM Comp vs. Raw Render: The Difference
Pro Tips and Best Practices
To truly master the SFM comp, you need to think like a cinematographer. Here is an industry-secret angle: Use Light Wraps.
A “Light Wrap” is a technique where the colors from the background subtly bleed onto the edges of the foreground character. This is the #1 way to make a character feel like they are actually in the environment rather than just pasted on top of it. You can do this by blurring a copy of your background and using the character’s silhouette as a mask.
Other Pro Tips:
-
Use LUTS: Look-Up Tables (LUTs) are like professional filters. Applying a subtle “Filmic” LUT can instantly unify the colors of your scene.
-
Depth Passes: Learn how to export a “Depth Map” (Z-Buffer) from SFM. You can use this in your comp to add realistic fog that sits behind some objects but in front of others.
-
Grain is Good: A tiny bit of digital noise/grain hides the “perfect” digital edges of 3D models and makes them look more organic.
Frequently Asked Questions
What is the best software for an SFM comp?
While Adobe After Effects is the industry standard for motion graphics, DaVinci Resolve is incredible for color grading and has a very powerful free version. For still posters, Photoshop or GIMP are your best bets.
Does compositing take a long time?
It can, but it saves time in the long run. Instead of re-rendering in SFM for three hours because a light was too dim, you can just brighten that area in your comp in three seconds.
Can I do an SFM comp for animations, or just posters?
You can (and should) do it for both! For animations, the process is the same, but you apply the effects to the entire image sequence rather than a single frame.
Why does my render look grainy before I even start the comp?
This usually happens because your Sub-Pixel Jitter settings in SFM are too low. Right-click your viewport, go to “Progressive Refinement,” and turn your samples up to at least 64 or 128 before exporting.
Do I need a powerful PC for compositing?
Compositing is more RAM-heavy than GPU-heavy. Having 16GB or 32GB of RAM will make your SFM comp workflow much smoother when playing back high-resolution sequences.
The Path to Cinematic Quality
The difference between a “hobbyist” and a “creator” is often just the willingness to go that extra mile. Source Filmmaker provides the stage and the actors, but the SFM comp provides the atmosphere and the polish. By moving your workflow into post-production software, you open up a world of creative possibilities that the 64-bit engine simply cannot reach on its own.
Your next step: Take your most recent SFM project, export it as a PNG sequence, and try to perform a basic “S-Curve” color adjustment in any photo or video editor. You’ll be amazed at how much life is hidden in your renders.
